GardenXpert Garden Advice Blog
The best way to propagate a peace lily is through division, by separating the plant into smaller sections. By carefully dividing the plant, each section can be repotted and given proper care to encourage new growth.
Propagating plants can be an exciting and rewarding way to expand your indoor garden. Peace lilies, known for their beautiful foliage and low-maintenance nature, can easily be propagated through division. This method involves separating the existing plant into smaller sections, each of which can develop into a new plant.
By following the correct steps and providing the necessary care, you can successfully propagate peace lilies and create a thriving collection. In this article, we will explore the best way to propagate peace lilies, giving you the confidence and knowledge to expand your greenery and enjoy the beauty of these elegant plants.
Brief Overview Of The Peace Lily Plant
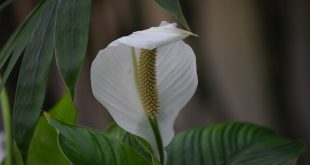
Peace lilies, known botanically as spathiphyllum, are beautiful tropical plants that can add a touch of elegance to any indoor space. Their lush dark green leaves and striking white flowers make them a popular choice among indoor gardeners. If you’re interested in propagating peace lilies, it’s essential to understand their unique characteristics and the reasons behind their popularity as an indoor plant.
So, let’s dive into the fascinating world of peace lilies.
Unique Characteristics Of Peace Lilies
- Peace lilies are not true lilies; they belong to the araceae family.
- These plants are native to the tropical rainforests of central and south america.
- One of the most distinctive features of peace lilies is the white spathe that surrounds the spadix, resembling a delicate flower.
- Peace lilies are known for their air-purifying properties, as they can absorb and filter harmful toxins from the air, providing us with cleaner and fresher indoor environments.
- They are relatively low maintenance plants and can tolerate low light conditions, making them suitable for office spaces and rooms with little natural sunlight.
- Peace lilies have a clumping growth habit and can reach a height of up to 3 feet, making them a perfect choice for adding vertical interest to your indoor garden.
Popular Indoor Plant Choice
- Recognized for their striking appearance and air-purifying abilities, peace lilies have become one of the most popular indoor plants.
- Due to their adaptability to various light conditions, peace lilies are suitable for both beginner and experienced plant enthusiasts alike.
- These plants thrive well in indoor environments and can be an excellent choice for those who want to bring a touch of nature into their homes but have limited outdoor space.
- Peace lilies are widely available at nurseries, garden centers, and online stores, making them easily accessible.
- With proper care, peace lilies can live for several years, providing a long-lasting and rewarding indoor gardening experience.
Now that we have explored the unique characteristics and popularity of peace lilies, let’s delve deeper into the process of propagating these delightful plants. Stay tuned for the upcoming sections, where we will discuss the different propagation methods and step-by-step instructions to help you successfully propagate your own peace lilies.
Benefits Of Propagating Peace Lilies
Propagating your peace lily is a fantastic way to not only expand your plant collection but also to share the plant love with others. There are several benefits to propagating peace lilies that make it a worthwhile endeavor. In this section, we’ll explore the advantages of propagating peace lilies.
Expanding Your Plant Collection
- Propagating peace lilies allows you to increase the number of plants in your collection without having to purchase new ones.
- By propagating, you can create new plants from a parent plant, giving you the opportunity to grow a variety of peace lilies.
- It’s an exciting and fulfilling process to witness the growth and development of these new plants, adding a sense of accomplishment to your plant hobby.
Sharing Plants With Others
- Propagating peace lilies provides you with the opportunity to share this beautiful plant with your friends, family, and fellow plant enthusiasts.
- Giving away propagated peace lilies is not only a generous gesture but also a way to spread positivity and joy through the act of gifting living plants.
- Sharing plants can also foster a sense of community and connection with others who share your love for gardening and indoor plants.
Remember, propagating peace lilies is not only about acquiring more plants or sharing them with others. It’s also an excellent way to connect with nature, nurture new life, and cultivate a sense of well-being. So why not give it a try and experience the rewards firsthand?
Division Method
Step-By-Step Guide For Dividing Peace Lilies
Peace lilies, with their lush green foliage and stunning white flowers, make for a beautiful addition to any indoor space. If you’re looking to propagate your peace lilies and create more plants, the division method is an effective way to do so.
Through this method, you can separate the mother plant into smaller sections, each with its own roots and leaves. Here’s a step-by-step guide to help you successfully divide your peace lily:
- Prepare your tools: Gather all the necessary tools such as a sharp, clean pair of gardening shears or a knife, some clean pots, and a well-draining potting mix.
- Choose a healthy plant: Select a mature peace lily with several stems and a well-developed root system. Ensure that the plant you choose is healthy and free from any pests or diseases.
- Water the plant: Before dividing the peace lily, water it thoroughly. This will help moisten the soil, making it easier to remove the plant from its pot without causing any damage to the roots.
- Remove the plant: Gently remove the peace lily from its pot, being careful not to break or damage the roots. Tap the sides of the pot or use a gardening tool to loosen the soil if necessary.
- Separate the roots: Once the plant is out of the pot, examine its root system. Look for natural divisions or sections where the plant can be separated. Using your hands or a sharp tool, carefully separate the roots, ensuring that each division has enough roots and shoots to survive on its own.
- Trim damaged roots: If you notice any damaged or dead roots, trim them away with clean shears or a knife. This will promote healthier growth in the divided sections.
- Plant the divisions: Fill clean pots with a well-draining potting mix. Make a small hole in the center of each pot and gently place a divided section into the hole. Pat the soil around the roots to secure the division in place.
- Water the divisions: After planting, water the divided sections thoroughly, allowing the excess water to drain out. Ensure that the soil remains moist but not soggy.
- Provide optimal conditions: Place the newly divided peace lilies in a location with bright, indirect light. Avoid exposing them to direct sunlight, as it can scorch the leaves. Maintain a consistent indoor temperature of around 65-85°f (18-29°c) for optimal growth.
- Monitor and care: Keep an eye on the divided sections, ensuring they receive adequate water and humidity. Mist the leaves occasionally to maintain humidity levels. Fertilize the plants every two to four weeks during the growing season with a balanced, water-soluble fertilizer.
Successfully propagating peace lilies through the division method requires careful attention to detail and proper care. By following this step-by-step guide, you can confidently create new plants from your existing peace lily and enjoy their beauty in multiple locations throughout your home or office.
Leaf Cutting Method
Propagation is an excellent way to expand your collection of peace lilies without breaking the bank. And when it comes to propagating peace lilies, the leaf cutting method is one of the most reliable and successful approaches. By following some simple steps, you can easily grow new peace lily plants from leaf cuttings.
In this section, we will explore the process of propagating peace lilies from leaf cuttings and discuss the best practices for ensuring successful results.
Process Of Propagating Peace Lilies From Leaf Cuttings:
- Start by selecting a healthy and mature leaf from the parent plant.
- Using clean and sharp pruning shears, make a clean cut at the base of the leaf, ensuring that you have a good portion of the leaf stem intact.
- Fill a small container with a well-draining potting mix, such as a mixture of perlite and peat moss.
- Insert the leaf cutting into the potting mix, burying the stem portion about an inch deep.
- Mist the potting mix and the leaf cutting with water to provide a moist environment for the cutting to root.
- Place the container in a warm and well-lit area, away from direct sunlight.
- Over time, the leaf cutting will develop roots, and a new plantlet will emerge from the base of the cutting.
- Once the new plantlet has grown a few leaves and established its own root system, you can carefully separate it from the parent leaf and transplant it into a new pot with fresh potting soil.
Best Practices For Successful Leaf Cuttings:
- Choose a healthy and disease-free leaf from the parent plant to increase the likelihood of successful propagation.
- Make sure to use clean and sharp pruning shears to minimize the risk of introducing any infections or diseases.
- Select a well-draining potting mix to prevent waterlogging and root rot.
- Maintain a consistently moist but not soggy environment for the cutting, as excessive moisture can lead to fungal issues.
- Provide moderate indirect light to the leaf cutting, as excessive sunlight can scorch the delicate tissues.
- Avoid disturbing the leaf cutting during the rooting process to allow the roots to develop undisturbed.
- Be patient and give the cutting sufficient time to root and establish itself before transplanting it into its own pot.
By following these steps and best practices, you can propagate peace lilies from leaf cuttings successfully. Enjoy the rewarding experience of growing your peace lily family and spreading the beauty of these gorgeous plants.
Rhizome Division Method
If you’re looking to expand your collection of peace lilies or help your existing plants thrive, the rhizome division method is a fantastic way to propagate these beautiful plants. With this technique, you can create new peace lily plants from the mature ones you already have.
Let’s delve into the details and explore the steps involved in this process.
Tips For Dividing Peace Lilies Using Rhizomes
Peace lilies have rhizomes, which are thick stems that grow horizontally beneath the soil surface. By dividing these rhizomes, you can create multiple plants and ensure their continued health and vitality. Here are some tips to help you successfully divide your peace lilies using the rhizome division method:
- Timing: The best time to divide peace lilies is during the spring or summer months when they are actively growing. This will give the divided plants ample time to establish themselves before the colder months.
- Preparation: Before dividing your peace lily, make sure to water it thoroughly a day or two in advance. This will help loosen the soil and make the division process easier.
- Clean tools: Use clean and sharp gardening tools, such as a knife or garden shears, to divide the rhizomes. This will minimize the risk of damaging the plant and ensure clean cuts.
- Gently separate rhizomes: Carefully dig up the entire plant and gently shake off excess soil. Locate the rhizomes and separate them by pulling them apart or using a clean knife to cut through them. Ensure each divided section has healthy roots and at least one leaf.
By following these tips, you’ll be well on your way to successfully propagating your peace lilies using the rhizome division technique. Remember to provide the new plants with proper care, including adequate sunlight, water, and suitable soil conditions. With a little patience and effort, you can multiply your peace lilies and enjoy their beauty throughout your home or garden.
Optimal Time For Propagation
Understanding The Ideal Season For Propagation
Peace lilies are beautiful and popular houseplants known for their lush foliage and striking white blossoms. If you’ve ever wondered about propagating these plants, one important consideration is the optimal time to do so. Understanding the ideal season for propagation can greatly increase your chances of success.
Here are some key points to keep in mind:
- Spring and early summer are generally the best seasons for propagating peace lilies.
- During this time, the plant is in its active growth phase, making it more responsive to propagation techniques.
- The warmer temperatures and longer daylight hours also contribute to the plant’s overall vitality and promote successful propagation.
- It’s important to note that peace lilies can be propagated year-round, but doing so during the favorable seasons increases the likelihood of success.
- Propagating during the optimal season allows the new plants to establish themselves and develop strong root systems before the onset of colder weather.
- Keep in mind that peace lilies are tropical plants, so it’s crucial to avoid exposing them to extreme temperatures during propagation.
Choosing the right time of year for propagating peace lilies can greatly enhance your chances of success. By taking advantage of the plant’s natural growth cycle and the optimal conditions provided by the spring and early summer seasons, you can enjoy the satisfaction of successfully propagating these beautiful houseplants.
Proper Preparation For Propagation
Propagation is an exciting way to expand your collection of peace lilies. With proper preparation, you can successfully propagate these beautiful plants and watch them thrive. In this section, we will discuss how to prepare the parent plant for propagation, ensuring its health and increasing the chances of successful propagation.
Preparing The Parent Plant For Propagation:
- Select a healthy parent plant: Choose a mature peace lily that exhibits vibrant foliage and vigorous growth. This ensures that the offspring will have the best chance of growing strong.
- Sanitize your tools: Before starting the propagation process, sanitize your gardening tools with rubbing alcohol or a diluted bleach solution to prevent the spread of diseases or pests.
- Choose the right time: Spring or early summer is the ideal time for propagating peace lilies as they are in their active growing phase. Avoid propagating during the dormant period as it may hinder the success of the process.
- Provide optimal growing conditions: Ensure that the parent plant is in a healthy state by providing it with proper care. This includes placing it in a location with bright, indirect sunlight, maintaining consistent watering, and fertilizing regularly to promote strong growth.
- Check for pests and diseases: Inspect the parent plant for any signs of pests or diseases such as spider mites, mealybugs, or root rot. Treat any issues before proceeding with propagation to prevent the spread to the new plants.
By taking these necessary steps to prepare the parent plant for propagation, you set the stage for successful and healthy offspring. Ensuring the health and vigor of the parent plant increases the chances of producing strong, resilient peace lily babies that will thrive in their new environments.
Ideal Environment For Propagation
Providing The Right Conditions For Successful Propagation
When it comes to propagating peace lilies, creating the ideal environment is crucial to ensure successful growth. Temperature, light, and humidity play key roles in promoting healthy propagation. Here are some key points to consider:
- Temperature: Peace lilies thrive in temperatures between 65°f to 85°f (18°c to 29°c). It’s important to keep the temperature stable and avoid drastic fluctuations that can stress the plants.
- Light: These plants prefer bright, indirect light. Placing them near a north or east-facing window is ideal, as they can benefit from the gentle morning sunlight without being exposed to intense midday rays.
- Humidity: Peace lilies are native to tropical regions and appreciate high humidity levels. You can increase humidity by grouping them with other plants, using a humidifier, or placing a tray of water nearby. Misting the leaves occasionally can also help maintain the desired humidity.
Remember the following tips to create an environment conducive to peace lily propagation:
- Maintain a stable temperature range between 65°f to 85°f (18°c to 29°c).
- Place the plant in a bright location with indirect light, preferably near a north or east-facing window.
- Provide adequate humidity by grouping with other plants, using a humidifier, or placing a tray of water nearby.
- Avoid exposing the plant to extreme temperature fluctuations or direct sunlight, as it can cause stress.
By ensuring the right conditions, you give your peace lily the best chance to thrive and propagate successfully.
Overwatering During Propagation
Propagating peace lilies is an excellent way to increase your collection without spending a fortune. However, when it comes to water requirements, these plants can be a bit finicky. Can have adverse effects on peace lilies, hindering their growth and overall health.
In this section, we will explore the impact of excessive moisture on peace lilies during propagation and provide some useful tips to prevent overwatering.
Impact Of Excessive Moisture On Peace Lilies:
- Overwatering can lead to root rot, a common issue when propagating peace lilies. This occurs when the roots are soaked in water for a prolonged period, suffocating them and causing them to decay.
- Root rot can result in stunted growth, yellowing leaves, and wilting. In severe cases, it can even lead to the death of the plant.
- Excessive moisture also increases the likelihood of fungal and bacterial diseases, which can further harm the plant’s health during the propagation process.
Tips To Prevent Overwatering:
- Use well-draining soil mix: Choose a soil mix specifically designed for indoor plants, ensuring it has adequate drainage. Such mixes often contain perlite or peat moss, promoting proper water movement.
- Monitor moisture levels: Before watering, always check the soil moisture. Insert your finger into the soil about an inch deep and water only if it feels dry. This helps avoid unnecessary watering.
- Water sparingly: During propagation, it’s crucial not to overdo watering. Allow the top layer of soil to dry out slightly before watering again. Peace lilies prefer slightly moist soil but can’t tolerate excessively wet conditions.
- Ensure proper drainage: Make sure your propagation container has drainage holes to prevent water from accumulating at the bottom. This allows excess water to escape, reducing the risk of overwatering.
- Adjust watering frequency: Depending on environmental conditions, you may need to adjust the frequency of watering. In warm and dry conditions, you may need to water more frequently, whereas in cooler and more humid environments, less watering is required.
By keeping these tips in mind, you can successfully propagate peace lilies without falling into the overwatering trap. Remember, maintaining a balance between providing adequate moisture and preventing excessive watering is key to the healthy growth and establishment of new peace lily plants.
Neglecting Proper Sanitation
Propagating peace lilies can be a rewarding experience, allowing you to expand your collection or share this beautiful plant with friends and family. However, neglecting proper sanitation during propagation can hinder the success of your efforts. Maintaining cleanliness is essential to ensure the health and vigor of your peace lily cuttings.
By following a few simple steps and incorporating good hygiene practices, you can increase the chances of successful propagation. Let’s explore the importance of maintaining cleanliness during propagation and the role of sanitizing tools and containers.
Importance Of Maintaining Cleanliness During Propagation
- Contaminated tools and containers can introduce harmful pathogens, bacteria, or pests to your peace lily cuttings, leading to diseases and stunted growth.
- Proper sanitation prevents the transfer of pests, such as spider mites or fungus gnats, which can wreak havoc on young plants.
- Cleanliness reduces the risk of fungal diseases, such as root rot or powdery mildew, by removing potential sources of infection.
- Maintaining a clean environment promotes overall plant health and ensures the vitality of your propagated peace lilies.
Sanitizing Tools And Containers
- Before starting the propagation process, sterilize your tools, such as scissors or pruning shears, by wiping them down with rubbing alcohol or a bleach solution.
- Cleanse the containers or pots you’ll be using with warm soapy water, ensuring they’re free from any residue or debris.
- Rinse the containers thoroughly, and if necessary, soak them in a diluted bleach solution to kill any lingering pathogens.
- Avoid reusing soil from old containers, as it may harbor diseases or pests. Instead, use fresh, sterile soil or a well-draining propagation mix.
- Consider using disposable gloves when handling peace lily cuttings to minimize the transfer of bacteria or viruses.
By prioritizing cleanliness during the propagation process, you can greatly improve the chances of your peace lily cuttings thriving. Remember to sanitize your tools and containers to safeguard against pests and diseases that could jeopardize the health of your future plants.
Maintaining a clean and hygienic environment will contribute to the overall success of your propagation endeavors.
Failing To Monitor Plant Health
Identifying Signs Of Stress Or Disease In Peace Lilies
Peace lilies are generally easy to care for, but they can still experience stress or fall prey to diseases. It is essential to keep an eye on the health of your peace lily to ensure it thrives. By looking out for common signs of stress or disease, you can take timely action to prevent any further damage or loss.
Here are some key points to consider:
- Wilting leaves: If your peace lily’s leaves appear droopy, limp, or yellowing, it may be a sign of both overwatering or underwatering or potentially root rot. Assess the moisture levels and adjust watering accordingly.
- Browning or blackened leaf tips: This can be an indication of poor humidity levels or over-fertilization. Increase humidity by misting the leaves, placing a tray with water nearby or using a humidifier. Consider reducing or diluting the amount of fertilizer used.
- Yellow leaves: Yellowing leaves can point to a variety of issues, such as exposure to direct sunlight, low humidity levels, or a nutrient deficiency. Ensure your peace lily is placed in a shaded area with indirect light and consider providing additional humidity or adjusting the feeding regimen.
- Brown spots: Brown spots on the leaves may indicate fungal or bacterial diseases. Remove affected leaves immediately to prevent further spread and ensure adequate air circulation around the plant.
- Stunted growth: If your peace lily is not growing or if new leaves appear smaller than usual, it may be due to inadequate light, nutrient deficiencies, or insufficient watering. Adjust the plant’s location to receive brighter, indirect light and review the watering and feeding schedule.
Steps To Take For Plant Recovery
Once you have identified signs of stress or disease in your peace lily, it is crucial to take prompt action to help the plant recover. Here are some steps you can take:
- Adjust watering: Evaluate the moisture levels in the soil and adjust the watering schedule accordingly. Ensure that the soil is consistently moist but not overly saturated.
- Improve humidity: Increase the humidity levels around the plant by misting the leaves, placing a tray with water nearby, or using a humidifier. This can help mitigate dry conditions that can contribute to stress.
- Monitor light exposure: Ensure your peace lily is placed in an area with indirect, bright light. Avoid exposing it to direct sunlight, as this can scorch the leaves and cause stress.
- Check for pests: Inspect your peace lily regularly for signs of pests, such as aphids or spider mites. If you notice any pests, treat them using appropriate organic or chemical methods.
- Prune and clean: Remove damaged or diseased leaves promptly to prevent further spread. Also, clean the leaves periodically to remove dust or debris that can hinder the plant’s ability to absorb light and moisture.
By closely monitoring your peace lily’s health and taking the necessary steps for recovery, you can ensure its longevity and enjoy the beauty of a thriving indoor plant. Remember to provide the right conditions of light, humidity, and proper care to support its well-being.
Yellowing Leaves During Propagation
Propagation is a great way to expand your peace lily collection or share the joy of these beautiful plants with others. However, it can be disheartening to see yellowing leaves during the propagation process. Don’t worry, though! There are several reasons why this might be happening, and simple solutions to address the issue.
Let’s dive into the causes and solutions to help you successfully propagate your peace lily without the worry of yellowing leaves.
Causes Of Yellowing Leaves:
- Insufficient light during the propagation process: Peace lilies thrive in bright, indirect light. When they don’t receive enough light, the plants may start to show signs of stress, including yellowing leaves.
- Overwatering: A common mistake during propagation is overwatering. Peace lilies prefer slightly moist soil, but soggy conditions can lead to root rot and yellowing leaves.
- Lack of humidity: Peace lilies enjoy high humidity levels, and when the air is too dry, they may respond with yellowing foliage.
- Nutrient deficiencies: During propagation, peace lilies may require additional nutrients. If they lack essential minerals, such as nitrogen or iron, the leaves may turn yellow.
Solutions To Address This Issue:
- Provide sufficient light: Place your peace lilies in a well-lit area, preferably near a window with filtered sunlight. If natural light is limited, consider using supplemental grow lights.
- Adjust watering routine: Make sure to water your peace lilies only when the top inch of soil feels slightly dry. Avoid overwatering by allowing the excess water to drain freely from the drainage holes.
- Increase humidity levels: Mist your plants regularly to increase humidity around them. Alternatively, you can place the pots on trays filled with water or use a humidifier to maintain optimal humidity levels.
- Provide adequate nutrients: Consider using a balanced liquid fertilizer during propagation to provide the necessary nutrients. Follow the manufacturer’s instructions for proper application to avoid overfertilizing.
By understanding the causes and implementing the appropriate solutions, you can prevent yellowing leaves during the propagation of your peace lilies. Keep these tips in mind to ensure healthy and vibrant new plants that will bring peace and beauty into your home or garden.
Root Rot In Propagated Peace Lilies
Peace lilies are known for their lush green foliage and elegant white flowers, making them a popular choice among indoor plant enthusiasts. Propagating peace lilies can be an exciting and rewarding process, but it’s important to be aware of the potential risk of root rot.
Understanding root rot and its causes, as well as prevention and treatment methods, is crucial to ensuring the successful propagation of these beautiful plants.
Understanding Root Rot And Its Causes
Root rot is a common problem that can affect peace lilies during the propagation process. It occurs when the roots are constantly exposed to excess moisture, causing them to become waterlogged and deprived of oxygen. This lack of oxygen leads to the growth of harmful bacteria and fungi, eventually resulting in the decay of the roots.
Key points to understand about root rot and its causes include:
- Overwatering is the primary cause of root rot in peace lilies. Excessive watering leads to waterlogged soil and prevents the roots from receiving sufficient oxygen.
- Poor drainage can contribute to the development of root rot. Using a well-draining potting mix and ensuring that the container has drainage holes can help prevent water from saturating the roots.
- Using contaminated or poorly sterilized tools when propagating peace lilies can introduce harmful pathogens to the roots, increasing the risk of root rot. It is essential to use clean and sterilized equipment to prevent the spread of diseases.
Prevention And Treatment Methods
Effective prevention and timely treatment can help protect propagated peace lilies from the detrimental effects of root rot. Here are some key points to consider:
Prevention methods:
- Allow the soil to dry out slightly between waterings. Peace lilies prefer evenly moist soil but can tolerate short periods of slight dryness.
- Ensure proper drainage by using a well-draining potting mix and placing the plant in a pot with drainage holes.
- Avoid using containers that are too large for the size of the plant, as excess soil retains more moisture and increases the risk of root rot.
- Use clean and sterilized tools and equipment when propagating peace lilies to prevent the introduction of harmful pathogens.
Treatment methods:
- If root rot is detected, it is crucial to act quickly to save the plant. Remove the affected parts of the root system, cutting back to healthy tissue.
- Repot the plant in fresh, well-draining soil, making sure to remove any remaining soggy soil.
- Adjust the watering schedule to ensure the plant receives adequate moisture without becoming waterlogged.
- Consider using a fungicide to treat the remaining healthy roots and prevent the spread of fungal infections.
By understanding the causes of root rot and implementing preventive measures, you can increase the chances of successfully propagating peace lilies without falling victim to this common problem. If root rot does occur, timely treatment can help save the plant and promote healthy growth.
Remember to provide proper care, including appropriate watering and well-draining soil, to ensure continued success with your propagated peace lilies.
Lack Of New Growth
Peace lilies are beloved houseplants known for their elegant white flowers and lush green foliage. If you’ve recently propagated a peace lily and noticed a lack of new growth, there could be several reasons behind this issue. However, fret not, as there are techniques you can employ to encourage growth and help your propagated peace lily thrive.
In this section, we will explore the reasons for a lack of new growth in propagated peace lilies and provide you with some effective techniques to promote growth.
Reasons For A Lack Of New Growth In Propagated Peace Lilies:
- Insufficient lighting: Peace lilies require bright, indirect light to thrive. If your propagated peace lily is not receiving enough light, it may struggle to produce new growth. Consider moving it to a spot with brighter, filtered light, away from direct sunlight.
- Improper watering: Peace lilies prefer consistently moist soil, but overwatering can lead to root rot, inhibiting new growth. Ensure that you are watering your propagated peace lily appropriately, allowing the soil to dry slightly between waterings. Avoid letting the plant sit in standing water, as this can also hinder growth.
- Nutrient deficiency: Peace lilies require regular feeding to maintain optimal growth. If your propagated peace lily is not receiving adequate nutrients, it may exhibit a lack of new growth. Consider fertilizing the plant every two to four weeks during the growing season with a balanced, water-soluble fertilizer.
Techniques To Encourage Growth:
- Provide proper lighting: Ensuring your propagated peace lily receives sufficient light is crucial for new growth. Place it near a north or east-facing window where it can receive bright, indirect light for several hours a day. If natural light is limited, you can supplement with artificial grow lights.
- Water appropriately: Finding the right balance with watering is essential. Check the soil moisture regularly by inserting your finger about an inch into the soil. Water when the top inch of soil feels dry. Always use room temperature water and avoid overwatering, which can lead to root problems.
- Maintain humidity: Peace lilies thrive in humid environments. Increase humidity around your propagated peace lily by placing it on a tray filled with pebbles and water. As the water evaporates, it will create a humid microclimate around the plant.
- Prune and remove dead foliage: Removing any dead or yellowing leaves will not only improve the appearance of your peace lily but also stimulate new growth. Use clean, sharp scissors or pruning shears to trim away any damaged or unhealthy foliage.
By addressing the potential reasons for a lack of new growth in propagated peace lilies and implementing the appropriate techniques, you can give your beloved plant the boost it needs to flourish. With a little care and attention, your peace lily will reward you with vibrant new growth and continue to bring beauty to your indoor space.
Frequently Asked Questions Of What Is The Best Way To Propagate Peace Lily?
How Do You Propagate A Peace Lily Using Cuttings?
To propagate a peace lily using cuttings, select a healthy leaf with a 2-inch stem, and place it in a jar of water. Keep the jar in a well-lit area but away from direct sunlight. After a few weeks, roots will start to grow, and you can transplant the cutting into a pot with soil.
Can You Propagate A Peace Lily In Water?
Yes, you can propagate a peace lily in water. Simply cut a stem with a leaf from the main plant and place it in a jar of water. Keep the water level constant and change it regularly. After the roots develop, you can transfer the cutting to soil.
How Long Does It Take To Propagate A Peace Lily From Cuttings?
It usually takes a few weeks to propagate a peace lily from cuttings. During this time, be patient and ensure the cutting receives adequate light and water. Once the roots have developed, you can begin the process of transplanting the cutting into soil for further growth.
What Is The Best Time To Propagate A Peace Lily?
The best time to propagate a peace lily is during the spring or summer seasons. These months provide the ideal conditions for growth, including warmth and increased sunlight. By propagating during this time, the plant will have a higher chance of successful root development and overall survival.
Can I Propagate A Peace Lily By Division?
Yes, you can propagate a peace lily by division. Carefully remove the plant from its pot and separate the offshoots that have their own roots. Plant each division in a separate pot with well-draining soil. This method is effective for rejuvenating older plants or creating new ones for yourself or others.
What Are Some Tips For Successful Peace Lily Propagation?
To increase the success of peace lily propagation, ensure the cutting or division has at least one healthy leaf and a small section of stem. Use clean tools to prevent disease transmission and provide adequate water and light throughout the process.
Additionally, maintaining a consistent temperature and humidity level will aid in successful propagation.
Conclusion
Propagating peace lilies can be an exciting and rewarding experience. By understanding the various methods, including dividing the plant, taking stem or leaf cuttings, and utilizing water propagation, you can successfully grow new peace lilies and expand your collection. Keep in mind the importance of providing optimal growing conditions, such as well-draining soil, indirect light, and regular watering.
Remember to take care when handling the plant, as peace lilies contain substances that can be toxic if ingested. Whether you are a beginner or a seasoned plant enthusiast, propagating peace lilies allows you to share the beauty and serenity of these elegant plants.