GardenXpert Garden Advice Blog
Knowing when to repot a peace lily is determined by checking for root-bound conditions such as roots growing through drainage holes or circling the pot. Repotting may be necessary when the plant outgrows its current container or shows signs of decline, like wilting or stunted growth.
Signs It’s Time To Repot A Peace Lily
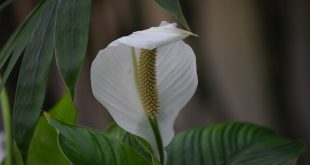
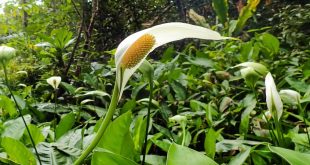
If you’re a plant lover, you probably understand the importance of giving your plants the proper care they need to thrive. One such plant that requires attention is the peace lily. While known for its beauty and air-purifying qualities, even peace lilies need to be repotted from time to time.
But how do you know when it’s time to repot your peace lily? Here are some signs to look out for:
Yellowing Or Wilting Leaves
One of the most obvious signs that your peace lily needs repotting is the presence of yellowing or wilting leaves. This can indicate that the plant has outgrown its current pot or that the soil has become too compacted, restricting the flow of water and nutrients to the plant’s roots.
Keep an eye out for leaves that are turning yellow, brown, or drooping excessively.
- Yellowing leaves: This can be a sign of both overwatering and root congestion, indicating the need for repotting.
- Wilting leaves: If your peace lily’s leaves are wilting, it may be a sign that the current pot is too small for the plant’s size.
Root Bound Plant
Another sign that it’s time to repot your peace lily is when you notice roots growing out of the pot’s drainage holes or wrapping around the base of the plant. This indicates that the plant has become root bound, meaning the roots have filled up the pot and have nowhere else to grow.
A root bound peace lily may struggle to take up water and nutrients, leading to stunted growth and poor overall health.
- Roots growing out of drainage holes: This indicates that the current pot is too small and the roots are actively seeking more space.
- Wrapping roots: If you gently remove the plant from its pot and notice roots circling around the base, it’s a clear sign of being root bound.
Stunted Growth
Have you noticed that your peace lily hasn’t been growing as much as it used to? If so, it might be an indication that the plant needs to be repotted. When a peace lily becomes root bound or is starved for nutrients due to compacted soil, its growth can become stunted.
This means the plant isn’t able to reach its full potential and may also display fewer or smaller flowers.
- Lack of new growth: If your peace lily has stopped producing new leaves, it may be time to repot.
- Smaller flowers: When a peace lily is root bound or lacks nutrients, it may produce smaller or fewer flowers than usual.
By keeping an eye out for these signs, you can ensure that your peace lily stays healthy and continues to enhance your indoor space. Repotting at the right time will provide the plant with the space and nutrients it needs, allowing it to thrive and bring joy to your home.
Guidelines For Choosing The Right Time
When it comes to repotting a peace lily, it’s important to know when the right time is. Repotting at the right time ensures that the plant remains healthy and continues to thrive. Here are some guidelines to consider when determining if it’s time to repot your peace lily:
Observe Growth Patterns And Frequency
- Pay attention to the growth patterns of your peace lily. If you notice that it’s outgrowing its current pot quickly or the roots are becoming congested, it may be time to repot.
- Look for signs of stunted growth or the development of smaller, less vibrant leaves. This could indicate that the plant has outgrown its current pot and needs more space for root expansion.
- Consider the frequency of watering. If your peace lily requires more frequent watering than before, it may be a sign that the roots have outgrown their current space and are struggling to absorb water efficiently.
Check The Pot Size And Root Density
- Examine the pot size in relation to the growth of your peace lily. If the roots are tightly packed and there is minimal space for further growth, it’s time to repot into a larger container.
- Gently remove the plant from its pot and inspect the root density. If you see a dense mass of roots that have filled the entire pot, repotting is necessary to allow the roots to spread out and access more nutrients.
Consider The Overall Health Of The Plant
- Evaluate the general health of your peace lily. If you notice yellowing or browning leaves, wilting, or overall decline in appearance, it may be a sign that the plant is not thriving in its current pot.
- Take note if the potting soil is consistently moist even after proper watering. This could be a sign that the root system is too large for the pot and the excess water is causing root rot.
Remember, every plant is unique, and there is no set timeframe for when a peace lily needs to be repotted. By closely observing the growth patterns, checking the pot size and root density, and considering the overall health of the plant, you can determine the right time to repot your peace lily, ensuring it continues to flourish in its new home.
How To Repot A Peace Lily Properly
Repotting a peace lily is an essential task that helps ensure the plant’s health and continued growth. Knowing when to repot a peace lily is crucial, but equally important is knowing how to repot it properly. When done correctly, repotting can provide the plant with fresh nutrients and space to flourish.
In this section, we will guide you through the process of repotting a peace lily step by step, from gathering the required supplies to ongoing care. So let’s get started!
Gather The Required Supplies
Before you begin repotting your peace lily, it’s important to gather all the necessary supplies. Here’s a list of items you’ll need:
- A new pot: Choose a pot one size larger than the current one to allow sufficient room for the plant’s roots to spread.
- Fresh potting soil: Opt for a high-quality potting mix that provides adequate nutrients and drainage for your peace lily.
- Gloves: Wearing gloves will protect your hands from any sharp edges or potential allergens present in the soil or plant.
- Pruning shears: These will come in handy for trimming any damaged or overgrown roots during the repotting process.
- Watering can or spray bottle: Having a watering tool nearby will make it easier to hydrate the plant and settle the soil after repotting.
Prepare The New Pot
Once you have all the necessary supplies, it’s time to prepare the new pot for repotting your peace lily. Follow these steps:
- Ensure the new pot has drainage holes at the bottom. If it doesn’t, consider drilling some to prevent waterlogging.
- Clean the pot thoroughly to remove any dirt or residue from previous use.
- Place some small stones or pot shards over the drainage holes to prevent soil from escaping while allowing water to flow freely.
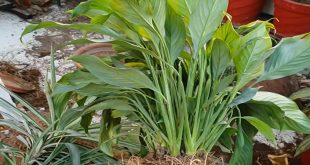
Carefully Remove The Plant From Its Current Pot
Before transferring your peace lily to its new home, you need to remove it from its current pot.
Here’s how:
- Gently water the plant a day or two before repotting to make the root ball easier to handle.
- Turn the pot upside down while supporting the plant’s stems with your hand.
- Tap the pot’s sides or give it a gentle squeeze to loosen the root ball.
- Slowly slide the plant out of the pot, gently loosening any trapped roots with your fingers if necessary.
Inspect The Roots And Trim If Necessary
Once you have the plant out of its pot, take a moment to inspect its roots. Look for any signs of root rot, brown and mushy roots, or overcrowding. If you notice any of these issues, it’s crucial to trim the roots before repotting.
Follow these guidelines:
- Using clean pruning shears, carefully trim away any damaged or unhealthy roots. Make clean cuts, removing only what is necessary.
- If the roots are excessively tangled or overcrowded, consider gently combing them apart with your fingers to encourage new growth.
Place The Plant In The Fresh Pot With New Soil
Now that your peace lily is ready for its new home, follow these steps to repot it successfully:
- Add a layer of fresh potting soil to the bottom of the new pot, ensuring it’s enough to raise the plant to the desired height.
- Place the peace lily onto the soil, adjusting its position as needed.
- Fill the remaining space around the plant with additional potting soil, gently pressing it down to secure the plant in place.
- Be mindful not to bury the plant deeper than it was before – keeping the base of the stems at the same level is crucial for its health.
- Once potted, lightly water the plant to help settle the soil and remove any air pockets.
Watering And Continuing Care
After repotting your peace lily, it’s important to establish a proper watering routine and provide ongoing care to ensure its well-being. Follow these guidelines:
- Water the plant thoroughly but avoid overwatering. Allow the top inch of soil to dry out between waterings.
- Peace lilies prefer bright indirect light, so place them in a location where they can receive adequate light without direct exposure to the sun’s harsh rays.
- Maintain a consistent temperature between 65-85°f (18-29°c) to promote optimum growth.
- Fertilize the plant every 6-8 weeks using a balanced houseplant fertilizer, following the manufacturer’s instructions.
By following these repotting guidelines and providing adequate care, your peace lily will continue to thrive and enhance the beauty of your indoor space. Remember to monitor the plant regularly and adjust your care routine as needed.
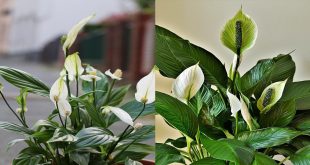
Guide To Choosing The Ideal Pot And Soil
Selecting the right pot size and material:
The proper pot size and material play a crucial role in maintaining the health and growth of your peace lily. Here are a few key points to consider:
- Choose a pot that is one to two inches larger in diameter than the current pot. This allows room for the plant’s roots to spread comfortably.
- Opt for a pot with good drainage holes to prevent waterlogging and ensure proper air circulation.
- Clay or ceramic pots are ideal choices as they provide stability and allow the soil to breathe.
- Avoid using plastic pots as they retain moisture and can lead to root rot if overwatered.
Recommended soil mix for peace lily:
The right soil mix is essential for the overall well-being of your peace lily. Consider the following points when selecting soil for repotting:
- Use a well-draining potting mix that holds moisture without becoming waterlogged. A mixture of peat moss, perlite, and vermiculite works well for peace lilies.
- Adding a small quantity of sphagnum moss or compost to the mix can improve soil structure and nutrient availability.
- Avoid using heavy garden soil, as it tends to be dense and can suffocate the roots of your peace lily.
Adding additional amendments for optimal growth:
To ensure optimal growth and flowering, you can incorporate additional amendments into the potting mix. Here are some recommendations:
- Slow-release fertilizers: These provide a continuous supply of nutrients to the peace lily over an extended period. Choose a balanced formula specifically formulated for houseplants.
- Organic matter: Adding well-decomposed compost or leaf mold enriches the soil and promotes healthy root development.
- Coconut coir: This eco-friendly alternative to peat moss helps retain moisture and provides aeration to the roots.
- Worm castings: These nutrient-rich organic matter are excellent natural fertilizers that enhance soil fertility and microbial activity.
By following these guidelines for pot selection, soil mix, and additional amendments, you can ensure that your peace lily thrives in its new environment. Remember, providing the right conditions will enable your plant to grow beautifully and display its stunning white flowers.
Repotting Tips And Tricks For Successful Transplantation
Are your peace lilies starting to look a little cramped? It may be time to repot them! Repotting is an important step in the growth and care of these elegant plants, ensuring their roots have enough space to spread and access essential nutrients.
But when should you repot your peace lily? And how can you do it successfully without causing unnecessary stress to the plant? In this section, we will explore some useful tips and tricks for repotting your peace lily to ensure a smooth transition and continued growth.
Avoiding Damage To The Plant And Its Roots:
When repotting your peace lily, it’s crucial to handle the plant and its roots with care, minimizing any potential damage. Here are some key points to remember:
- Gently remove the plant from its current pot, taking care not to break or damage the stems or leaves.
- Inspect the root system and gently untangle any crowded or tangled roots, promoting healthy growth.
- Trim any dead or diseased roots before repotting to prevent the spread of disease and promote overall plant health.
Preventing Overwatering Or Underwatering During Transition:
Watering is a crucial aspect of successful repotting, as it helps the plant adjust to its new environment without experiencing water stress. Consider the following tips:
- Water your peace lily thoroughly a day or two before repotting to ensure the roots are well-hydrated.
- After repotting, allow the soil to dry slightly before watering again to prevent overwatering, which can lead to root rot.
- Monitor the moisture levels in the soil regularly and adjust your watering schedule accordingly to prevent underwatering, which can cause the plant to wilt.
Adjusting Light And Temperature Conditions Gradually:
Changing the light and temperature conditions too suddenly can shock a peace lily and hinder its growth. Follow these steps to provide a smooth transition:
- After repotting, place the peace lily in a location with similar light conditions as its previous spot.
- Gradually expose the plant to increased light levels over a few weeks to avoid sudden stress.
- Similarly, maintain a consistent temperature for the plant to avoid any sudden fluctuations that could result in shock or damage.
Remember, repotting your peace lily is a beneficial practice to ensure healthy growth and longevity. By following these tips and tricks, you can successfully transplant your peace lily without causing unnecessary stress or damage.
Frequently Asked Questions Of How Do You Know When To Repot A Peace Lily:
Peace lilies are popular houseplants known for their elegant, dark green leaves and beautiful white flowers. Like any other plant, they require the occasional repotting to ensure their growth and health. However, knowing when to repot a peace lily can often be a challenge for many plant enthusiasts.
In this frequently asked questions section, we will address some of the common doubts regarding repotting peace lilies.
How Do I Know When To Repot A Peace Lily?
Repot your peace lily when you notice the roots have outgrown the current pot or when the soil stays soggy. Look for roots creeping out of the drainage holes or a lack of growth and droopy leaves, indicating the need for a larger container.
Can I Repot My Peace Lily Immediately After Purchasing It?
It’s best to wait a few weeks after purchasing your peace lily before repotting. This allows the plant time to acclimate to its new environment and reduces the risk of transplant shock. Monitor its growth and ensure it’s healthy before repotting.
What Size Pot Should I Use When Repotting My Peace Lily?
Choose a pot that is one or two sizes larger than the current one. This allows room for the roots to grow without overwhelming the plant. Make sure the new pot has drainage holes to prevent waterlogged soil, which can cause root rot.
Should I Use Special Soil When Repotting My Peace Lily?
A well-draining potting mix is ideal for repotting a peace lily. You can use a commercial houseplant potting mix or create your own by combining equal parts peat moss, perlite, and vermiculite. Avoid using heavy garden soil, as it can retain too much moisture.
How Often Should I Repot My Peace Lily?
Peace lilies generally need to be repotted every one to two years. However, if the plant is showing signs of being root-bound or the growth has significantly slowed down, it’s best to repot it sooner. Regularly check the roots and consider repotting when necessary.
Conclusion
Knowing when to repot a peace lily is essential for its health and growth. By understanding the signs and taking timely action, you can ensure its continued vitality. Over time, as the peace lily outgrows its current pot, you may notice its roots becoming tightly bound, a decrease in foliage or flowering, or even waterlogged soil.
These are all indications that repotting is necessary. Carefully selecting a larger pot and using a well-draining soil mix will promote proper root development and prevent water stagnation. Trimming any damaged or dead roots during repotting will also help rejuvenate the plant.
Additionally, repotting offers an opportunity to refresh the soil and remove any accumulated salt or mineral deposits. Remember, a healthy peace lily not only enhances the aesthetic of your space, but also improves air quality by eliminating toxins. So, be attentive to your peace lily’s needs and provide it with the right conditions to thrive.